free virus scan

I Can't Print to a Network Printer, What Do I Do?

Network printers are easy to use and share resources, since large network printers typically print much faster than small desktop models. The problem, of course, is that when the network printer is down, no one can print, so knowing how to find and resolve the source of the problem is essential. Follow the given tips to solve the problem.

Step1: First check the network status from Network and Sharing Center option. From this option you can check whether your computer is connected to your network or the Internet, the type of connection, and what level of access you have to other computers and devices on the network.

From Start button -> go to Control Panel-> Network and Internet-> Network and Sharing Center

Can't Print to a Network Printer
Step2: Now try to identify and resolve the home network problems. Right-click on the network icon and open Network Diagnostics and the click Diagnose and repair.

Step3: Try to troubleshoot file and printer sharing.
  • Check the printer status that it is powered on and ready to use. And also check that the computer you are trying to print from is connected to the shared network.  
  • Make sure that each computer that you want to access for printing is in the same workgroup. The name of the workgroup should be exactly the same on every computer. If the printer is plugged in to another computer and shared on the network, make sure that the computer is turned on.

See also: How to Fix a Printer Spooler Error
                How to Fix 'Access Denied' Error when Printing to a Shared Printer


How to Update Printer Drivers Manually

How to Update Printer Drivers Manually
Printer drivers help the printer to understand and execute commands from the PC .Suppose, Windows cannot find a driver for your printer and the printer didn’t come with driver software or the printer is no longer compatible with Windows OS that time you will need to update the printer drivers (see:What to Do When Your Canon Printer Stops Working). Follow the given steps to update printer drivers.

Step1: Find the model number of the printer from manufacturer's website. Then click the link to download the latest driver file to your hard drive.

Step2: Close all the windows and locate the driver file.double-click the file to begin the installation. Follow the below points to update printer drivers.

  • From Start button ->go to Control Panel-> click the System and Security option -> System-> Device Manager.
  • If you're prompted for an administrator password or confirmation, type the password or provide confirmation.
  • In the list of hardware categories, find the printer that you want to update, and then double-click the printer name.
  • Click the Driver tab->Update Driver, and follow the onscreen instructions.
See also:
                How to Fix 'Access Denied' Error when Printing to a Shared Printer

How to Fix 'Access Denied' Error when Printing to a Shared Printer

The "Access Denied" error can occur when you try to print from a shared printer on your home network. To solve this error in Windows XP system, follow the given steps.

How to Fix 'Access Denied' Error when Printing to a Shared PrinterStep1: Check that the Windows XP computer is properly connected to the home network and set to share printers. You can check the connection from other computer on your network.

Step2: If you are still getting "Access is Denied" error, then try this method. Click the Start button-> go to Control Panel-> click the Printers and other Hardware option.

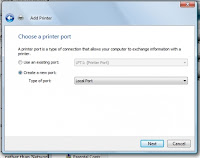
How to Fix 'Access Denied' Error when Printing to a Shared PrinterStep3: Click Add a printer. It will open Add Printer wizard and click Add a local printer.

Step4: Select Create a new port and check that Local Port is selected or not. Then click Next.

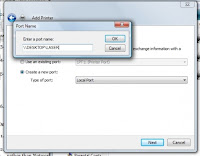
Step5: Type \\computer name\printer name in the Port Name dialog box and then click OK.

Step6: Follow the onscreen instructions and click Finish.

See also: What to Do When Your Printer Goes Down
                 How to Fix a Printer Spooler Error
 

How to Replace Printer Cartridges

How to Replace Printer Cartridges
Now a printer has on-screen alerts that let you know when the ink/toner level of the cartridge are low. Different print cartridge manufacturers have set out methods to notify you about the levels of the cartridges. When you attempt to print, it appears streaky or blank. This indicates that you need to replace the cartridges. Follow the given steps to replace printer cartridges.

If you want to fix HP printer error, then follow this blog-
How to Fix HP Printer Errors
 
Step1: Check printer cartridge compatibility before unpacking a new print cartridge. Make sure that it is compatible with your printer.

Step2: Press the Power button to turn on the printer.

Step3: Close the printer cartridge and rear doors, if they are not already closed.

Step4: On the product control panel, press the Print Cartridge button . The product rotates the print cartridge carousel.

Step5: Open the printer cartridge door.

Step6: If the cartridge you want to replace is not in the position for removal, close the printer cartridge door, and then press the Print Cartridge button  to rotate the carousel. Otherwise, continue to the next step.

Step7: Grasp the handle on the old print cartridge, and then pull the print cartridge straight out to remove it.

Step8: Close the print cartridge door. After you close the print cartridge door, the control panel displays the 'Initializing ' message. Wait until product is idle and silent before proceeding.

See also: How to Fix a Printer Spooler Error
                What to Do When Your Canon Printer Stops Working

How to Use HP Hardware Diagnostic Tool

HP Diagnostic Tools are designed to automatically diagnose and resolve many hardware problems. These tools include the  "HP Scan Diagnostic Utility" that will help to troubleshoot scanning problems, the "HP Print Diagnostic Utility" that allows to solve printing problems, and the "HP Network Diagnostic Utility" that will help to resolve network issues including wireless network connections with your printer.
You can download and install these free diagnostic tools from the HP website. I’ll discuss about the HP Hardware Diagnostic tool here which fixes some common printer problems listed below.

    How to Use HP Hardware Diagnostic Tool
  • Paper Jam
  • Carriage Stall
  • Original (document feeder) Jam
  • Out of Paper
  • Paper Mismatch
  • Blinking Lights
  • Door Open
  • Print Quality
Follow the simple steps to download and install the hardware diagnostic tool(see:Steps to Install a New HP Printer).

Step1: Download the latest version of Hardware Diagnostic Utility from the HP website. But before downloading, make sure that your system meets the system requirement.

Step2:  When the Security Warning dialog box opens up, select one of two options viz. Run or Save.

Step3: Run the Hardware Diagnostic Utility. You will see a list of installed products on the Hardware Diagnostic Utility screen.

Step4: From the Printer column in the Hardware Diagnostic Utility, select your HP product and click the Diagnose button. The tool will now begin to diagnose your printer and computer for various hardware problems or errors and display the results.

Step5: The results will display either when an error is detected, or when the diagnosis is completed. If errors are detected, then follow the on screen instructions and fix problems. 

Note: If you are facing any problems running the tool, then you can seek online technical support.

See also: Troubleshooting Your HP Printer Problems
                How to Connect My HP Printer to a Computer

How to Make Windows Vista Faster

How to Make Windows Vista Faster
Windows Vista is an operating system that can be heavy on system resources, making your computer run slowly. If your Windows Vista computer is slow, you can improve its functionality in a number of ways and make it run faster(see:Steps to Repair Microsoft Windows Vista). Follow the given steps to make windows vista faster.
If you want to find network setting in Windows Vista,follow this blog-How to find Network Settings in Windows Vista .

Step1: The simplest way to improve performance is to add more memory (RAM) to your system – 1GB (1024MB) is the minimum recommended amount, but add as much memory as you can afford or your system support. Otherwise change the display settings and disable Windows Welcome screen. Follow the given steps to do that.

Step2: Switch your display to Windows Standard from "Start” menu > "Control Panel" > "Appearance and Personalization" > "Personalization" > "Window Color and Appearance". In the Color Scheme menu, click "Windows Standard," then click "OK."

Step3: Disable the Windows Welcome screen. Click "Start" > "Control Panel" > "Classic View" > "Welcome Center" and uncheck the box at the bottom of the window that reads "Run at startup."

Step4: Remove unnecessary programs. Normally new computer often comes loaded with unnecessary programs that have little use or are never used. To check list of the programs, Click "Start" > "Control Panel" > "Programs and Features".

Step5: Disable unused items from the task bar. Right-click an empty space on the taskbar and click "Properties." Click the "Notification Area" tab and click the "Customize" button. Go through the list of programs and select the program which you want to disable.

Step6: Upgrade your drivers as these are used for graphics cards and chipsets – these can lead to better performance.

Step7: Stop auto start application, which makes your system slow.

Step8: Clean unnecessary icons from your desktop.

See also: What to Do When Microsoft Windows Vista Won't Shut Down - Causes and Solutions
                 Microsoft Windows Vista Keeps Restarting Problem - Here Is Your Solution


How to Format Windows XP

Formatting a hard drive erases all data on the drive, so it is important to back up all your wanted data to an external hard drive before proceeding. If you want to format Windows XP, then you need Windows XP installation CD. Follow the given steps to format Windows XP.
If you want to fix slow start up in Windows XP then follow this blog- How to Fix Windows Xp Slow Startup

Step1: First you must put your Windows XP CD in the drive.

Step2: Then restart your computer. And press Delete key repeatedly on the keyboard.

Step3: When it says press any key to boot from cd, Press any key on the keyboard.
How to Format Windows XP
Step4: Go into the BIOS settings of your PC, Check your motherboard information and enable “Boot from CD” option from your BIOS.

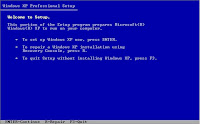
Step5: After you enter the setup, the CD will load up a blue screen and will start loading operating system files (it will take few minutes). When it finishes, it will list a few options, click the option “Press ENTER to set up Windows XP now”.

Step6: Press F8 to accept Microsoft license agreement.

Step7: Press Enter to start the Windows installation.

Step8: Delete old partition and format. At this point you need to select the partition where you prefer to install Windows XP.

Step9: Create installation partition. Select un-partitioned space and press “C”.

Step10: Select format using NTFS (Quick) and hit Enter.

Step11: Setup will start and auto-format the “C:” partition, and start with Windows XP installation. It will reboot the setup and Copy all the files needed for Windows setup.

Step12: wait for few minutes and do not remove the Windows XP CD until the computer has started up with a new desktop and icons.

See also: What to Do When Microsoft Windows XP Won't Shut Down
                How to Scan Windows and Fix Errors